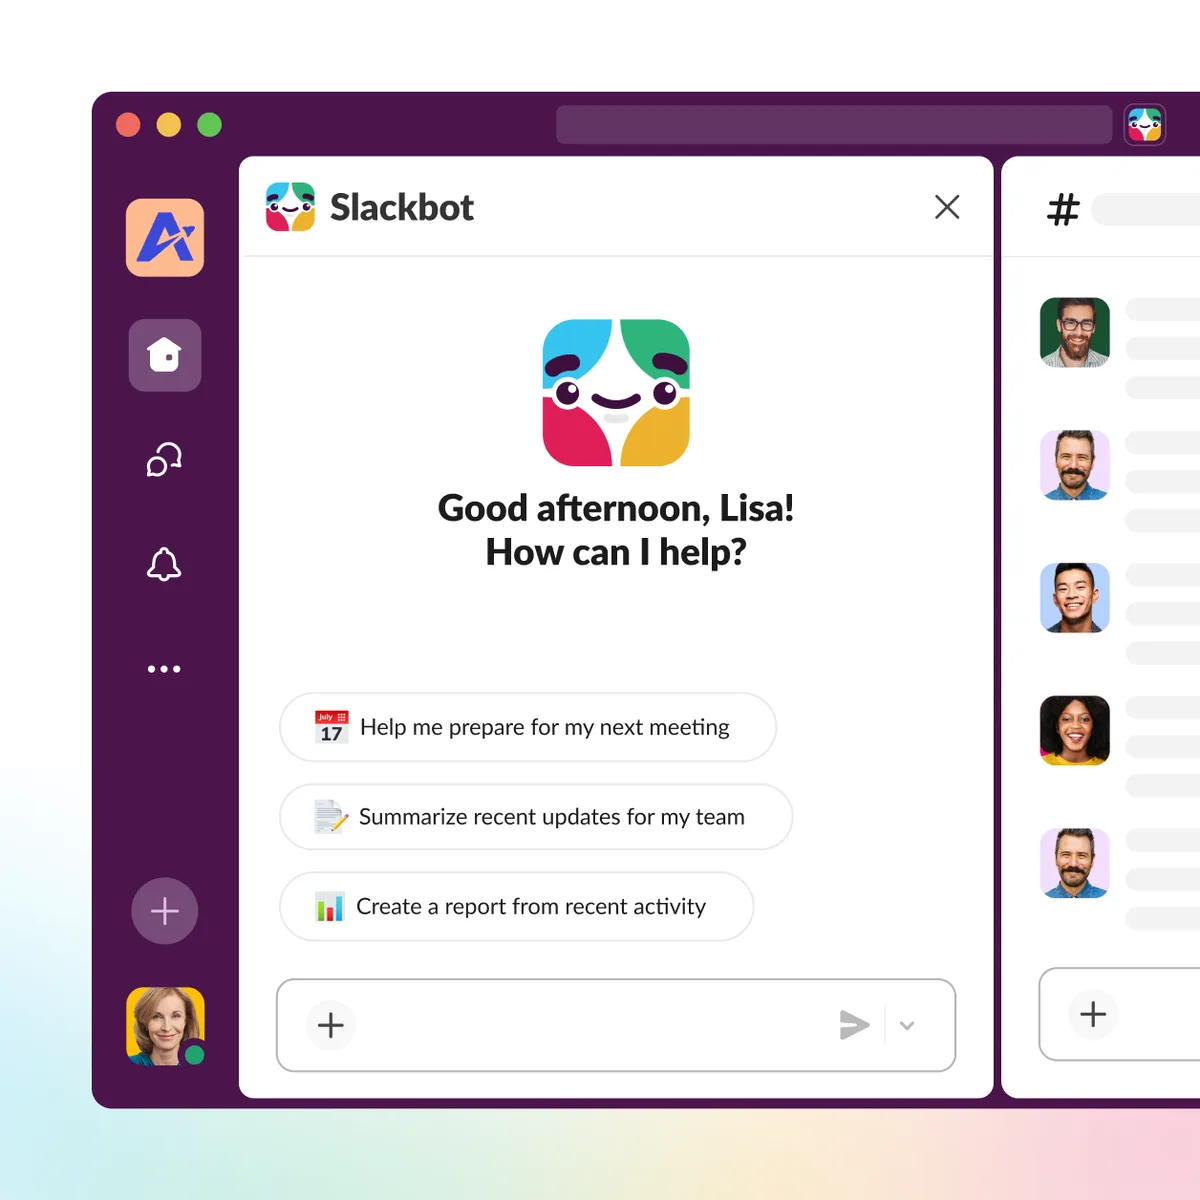
Introduction
AI assistants are quickly becoming part of the modern workplace. Instead of switching between multiple applications, teams increasingly expect to ask questions, generate content, summarize conversations, or automate repetitive tasks directly from the tools they already use every day. Slack has naturally become one of the most popular platforms for bringing these AI capabilities into team workflows.
While Slack offers its own AI features, building a custom Slack AI Assistant gives you complete control over its behavior, integrations, and knowledge. You can connect it to your own applications, internal APIs, company documentation, or business workflows to create an assistant tailored to your organization’s needs.
In this tutorial, you’ll learn how to build a Slack AI Assistant from scratch using Node.js, TypeScript, Slack Bolt, and the OpenAI API. We’ll start with a simple AI-powered chatbot that responds to Slack messages, then gradually evolve it into a production-ready assistant in future articles.
What You’ll Build
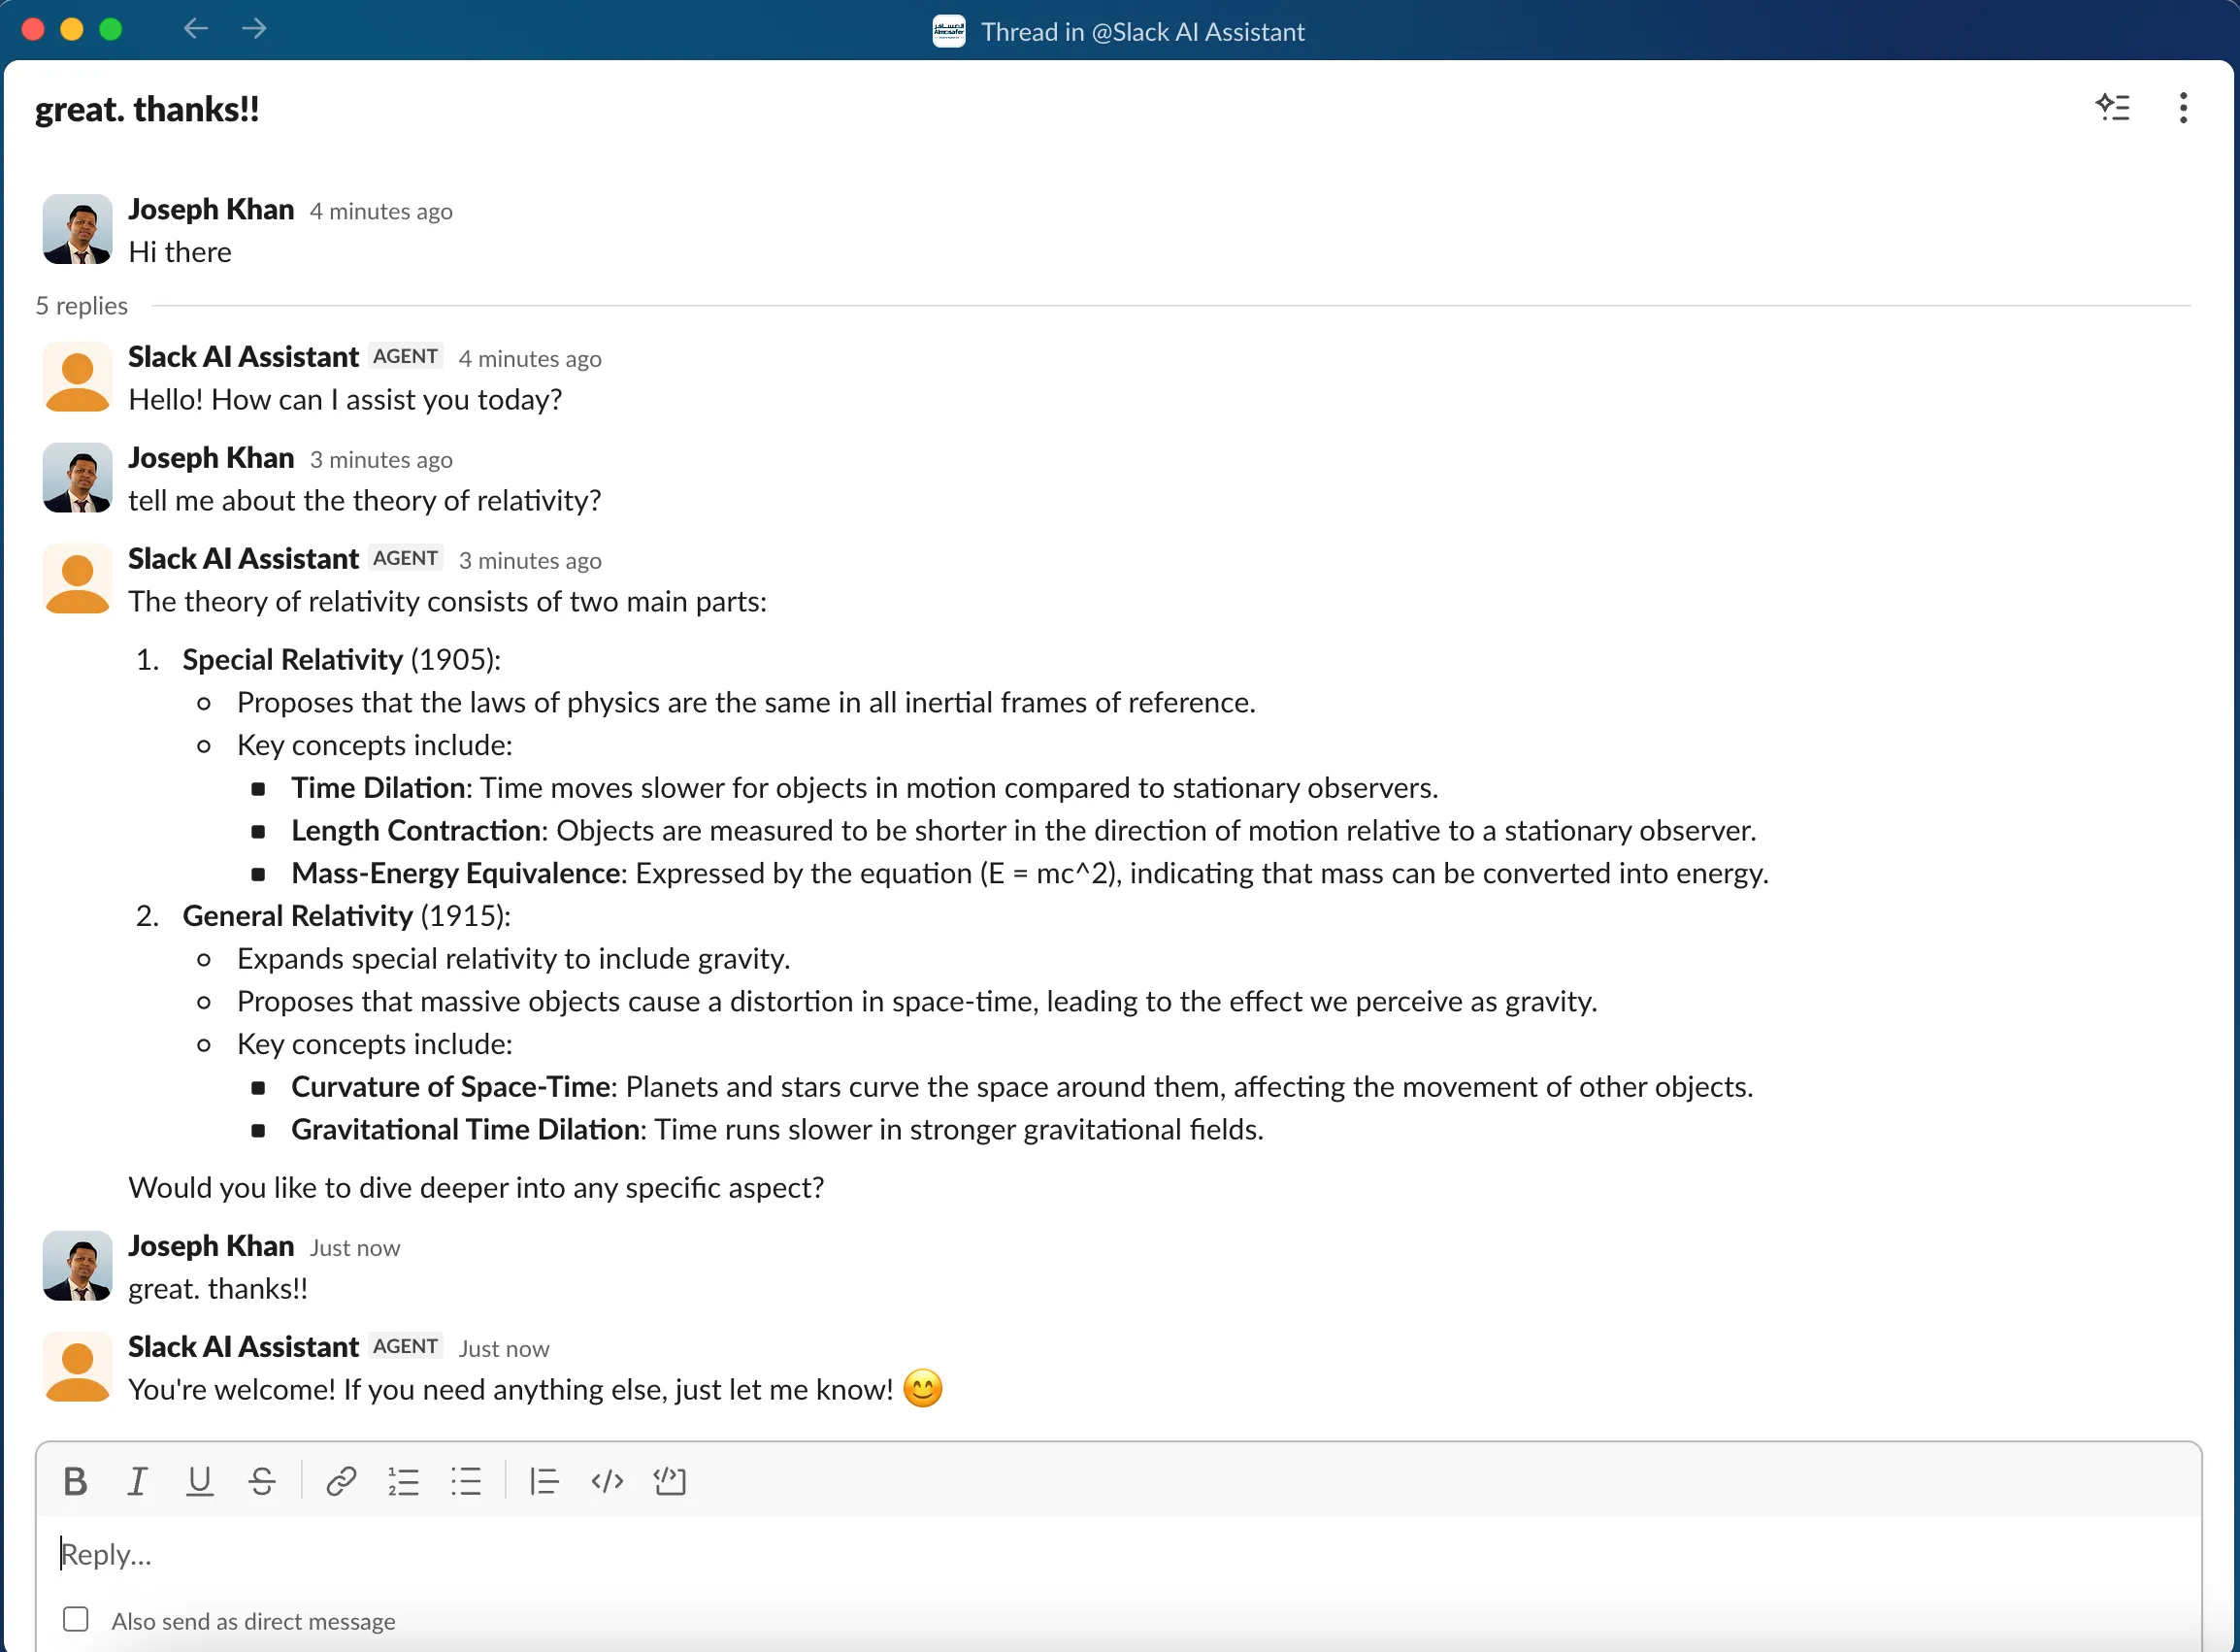
In this first part of the series, we’ll build a simple but fully functional Slack AI Assistant that listens for messages in Slack, sends user prompts to the OpenAI API, and streams AI-generated responses back to users in real time.
By the end of this tutorial, you’ll have an assistant capable of:
- Responding to messages when mentioned in Slack
- Sending user prompts to an OpenAI Large Language Model (LLM)
- Streaming AI responses back to Slack as they’re generated for a faster, more interactive user experience
- Generating intelligent, context-aware answers
- Running as a Node.js application using the Slack Bolt framework
- Serving as a solid foundation for more advanced AI capabilities
To keep the implementation easy to understand, we’ll communicate directly with the OpenAI API without adding extra layers such as vector databases, Retrieval-Augmented Generation (RAG), or long-term conversation memory. This is only the beginning. In the next part of this series, we’ll transform this basic chatbot into a much more capable RAG-powered Slack AI Assistant. We’ll integrate a vector database, allow the assistant to answer questions using your own documents, and maintain conversation history by preserving Slack thread context. We’ll also explore advanced capabilities such as conversation memory, citations from internal knowledge sources, and more production-ready AI patterns for enterprise applications.
Getting Started
Before we start writing any code, let’s set up everything we’ll need for the project. The setup process is straightforward and should only take a few minutes.
To keep this tutorial focused on building the Slack AI Assistant, the setup instructions below have been intentionally kept brief. If you run into any issues during installation or configuration, don’t worry, I’ve included additional official documentation and troubleshooting resources at the end of this article.
Requirements
Before getting started, make sure you have the following:
- Node.js 20 or later installed
- npm (included with Node.js)
- A Slack workspace where you have permission to install apps
- An OpenAI account with API access
- A code editor such as Visual Studio Code
- Git installed on your machine
Clone the Project
Instead of creating the project from scratch, you can clone the starter repository that we’ll use throughout this tutorial.
git clone https://github.com/jsphkhan/slack-ai-assistant.git
cd slack-ai-assistant
npm install
The repository already contains the basic project structure, Slack Bolt configuration, and the application code that we’ll build upon throughout this guide.
Create a Slack App
Next, we’ll create a Slack application that our assistant will use to communicate with your workspace.
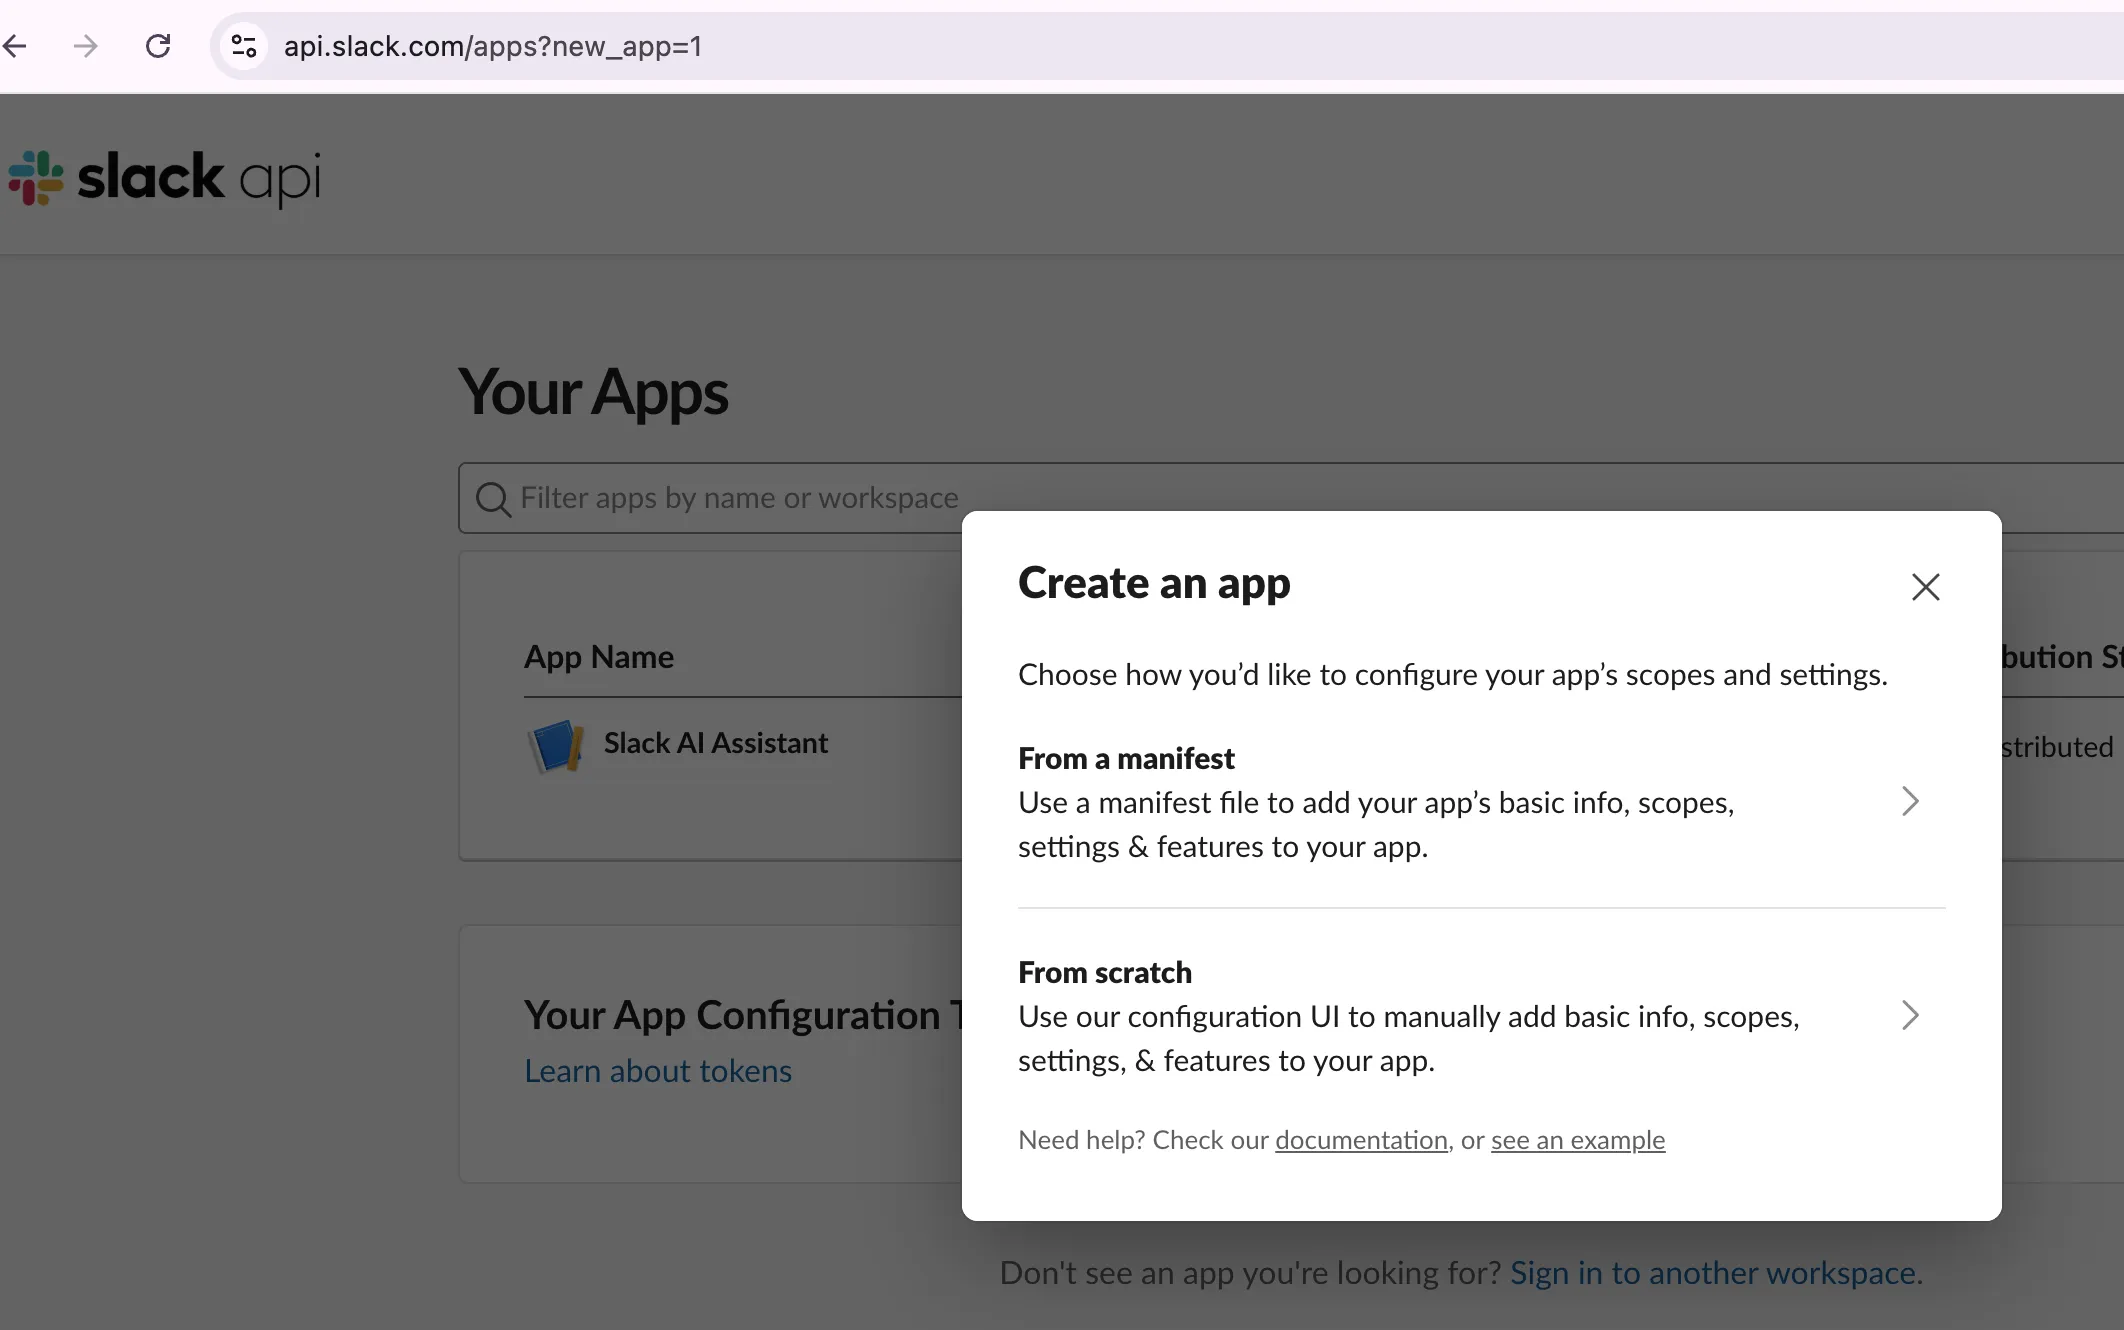
- Visit https://api.slack.com/apps/new
- Select From a manifest
- Choose the workspace where you want to install the assistant
- Open the
manifest.jsonfile from the cloned repository - Copy and paste its contents into the Slack manifest editor
- Create the application
- Click Install App and authorize it for your workspace
Using the provided manifest automatically configures the required bot scopes, event subscriptions, and application settings, saving you from configuring everything manually.
Why a Slack App needs to be created?
Generate an OpenAI API Key
The assistant uses the OpenAI API to generate AI-powered responses. To create an API key:
- Sign in to your OpenAI account.
- Navigate to the API Keys section.
- Create a new secret key. It will look something like
sk-proj-... - Copy the generated key and store it securely.
- You’ll use this key later when configuring the application’s environment variables.
Important:
- You need an OpenAI Platform account with a billing method attached to generate and use API keys.
- Never commit your API key to Git or expose it in your source code. Always store it securely using environment variables.
Once these steps are complete, you’re ready to configure the project and run your first Slack AI Assistant locally.
Understanding the Basics
Why do I need to create a Slack App?
Think of a Slack App as the identity and security layer between Slack and your Node.js application. Your Node.js server cannot simply connect to Slack and start reading or sending messages. Slack needs a secure way to know:
- Who is connecting?
- Which workspace is the app allowed to access?
- What permissions does it have?
- Where should Slack send events like messages or mentions?
When you create the app, Slack issues credentials such as Bot Tokens and Signing Secrets that your Node.js application uses to authenticate with Slack’s APIs. The app also defines the permissions (OAuth scopes) your assistant needs, such as reading messages, responding to mentions, or posting replies.
Slack Tokens and Permissions
When we created our Slack App using the provided manifest.json, Slack automatically configured the application’s features, permissions, and event subscriptions. This saves us from manually configuring each setting and ensures everyone following this tutorial starts with the same configuration.
The application uses the following credentials:
| Credential | Purpose |
|---|---|
Bot User OAuth Token (xoxb-...) | Authenticates the application when calling Slack APIs to send messages, reply in threads, join channels, and stream AI-generated responses. |
App-Level Token (xapp-...) | Used by Slack Bolt to establish a secure WebSocket connection with Slack using Socket Mode, allowing the application to receive events without exposing a public HTTP endpoint. |
| Signing Secret | Verifies that incoming requests genuinely originate from Slack, protecting your application from unauthorized or forged requests. |
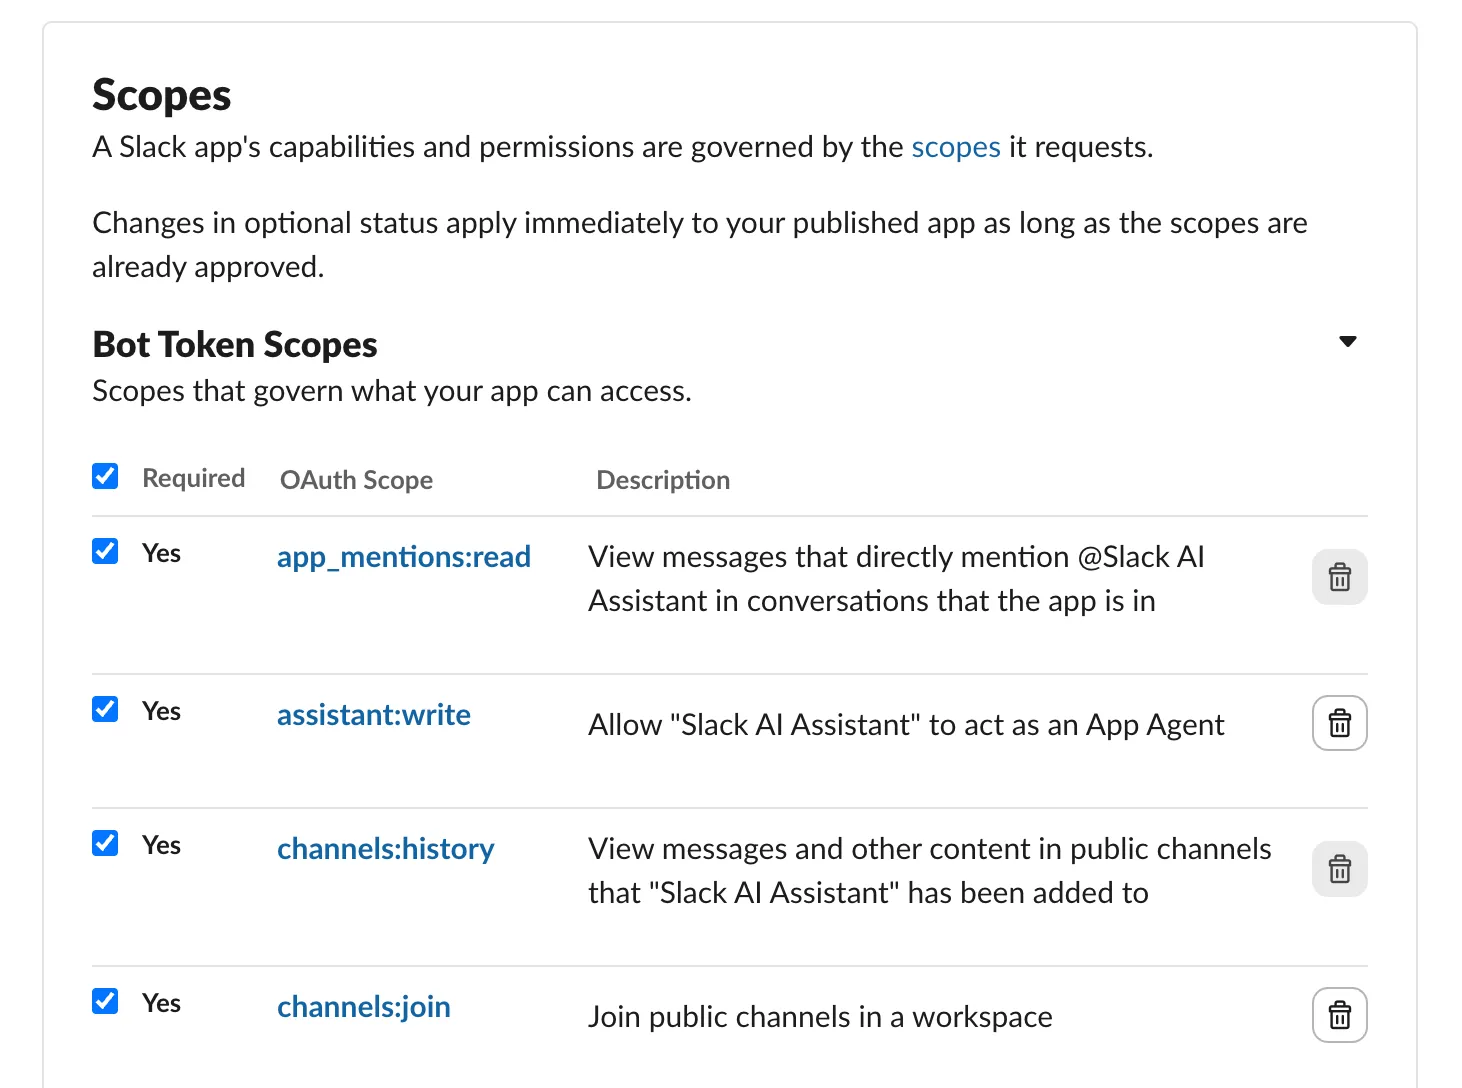
The manifest also grants the bot the OAuth scopes (permissions) it needs to function correctly:
| OAuth Scope | Purpose |
|---|---|
app_mentions:read | Receive events when users mention the assistant using @Assistant. |
assistant:write | Enables the application to participate in Slack’s AI Assistant experience, including streaming AI responses. |
chat:write | Send messages and replies back to Slack conversations. |
channels:join | Allow the bot to join public channels when required. |
channels:history | Read messages from public channels the bot has access to. |
groups:history | Read messages from private channels the bot has been invited to. |
im:history | Read messages from direct conversations with users. |
commands | Handle Slack slash commands if the application defines them. |
Finally, the manifest subscribes the application to several Slack events, including app mentions, direct messages, channel messages, and AI Assistant thread events. Whenever one of these events occurs, Slack delivers it to our Node.js application over Socket Mode, allowing the assistant to process the request and generate an AI-powered response.
Setting Up Environment Variables
Our application requires a few configuration values to connect securely with Slack and the OpenAI API. Rather than hardcoding these values into the source code, we’ll store them as environment variables.
Create a .env (clone .env.example and rename as .env) file in the project’s root directory and add the following variables:
| Environment Variable | Purpose |
|---|---|
SLACK_BOT_TOKEN | Authenticates your application when calling Slack APIs to send messages, reply in threads, and stream AI responses. |
SLACK_APP_TOKEN | Used by Slack Bolt to establish a secure connection with Slack when using Socket Mode. |
SLACK_SIGNING_SECRET | Verifies that incoming requests genuinely originate from Slack, protecting your application from unauthorized requests. |
OPENAI_API_KEY | Authenticates your application when making requests to the OpenAI API. |
OPENAI_MODEL | Specifies the OpenAI model the assistant will use to generate responses. We’ll use gpt-4o-mini throughout this tutorial. |
PORT | The local port on which the Node.js application will run. |
What is Socket Mode?
Socket Mode is an alternative way for your Slack application to receive events from Slack. Normally, Slack sends events (such as app mentions or messages) to your application using an HTTP webhook endpoint. That means your Node.js application must be publicly accessible over HTTPS so Slack can reach it.
With Socket Mode, your application opens an outbound WebSocket connection to Slack instead. Slack then delivers all events through that secure connection, so you don’t need to expose a public URL. Our project uses Socket Mode, which is why you’ll see the SLACK_APP_TOKEN environment variable in the application configuration. For beginners, it’s actually the easier option because they don’t have to:
- buy a domain
- configure HTTPS
- expose localhost with ngrok
- configure Slack Request URLs
How to Generate the Slack Bot Token and App Token
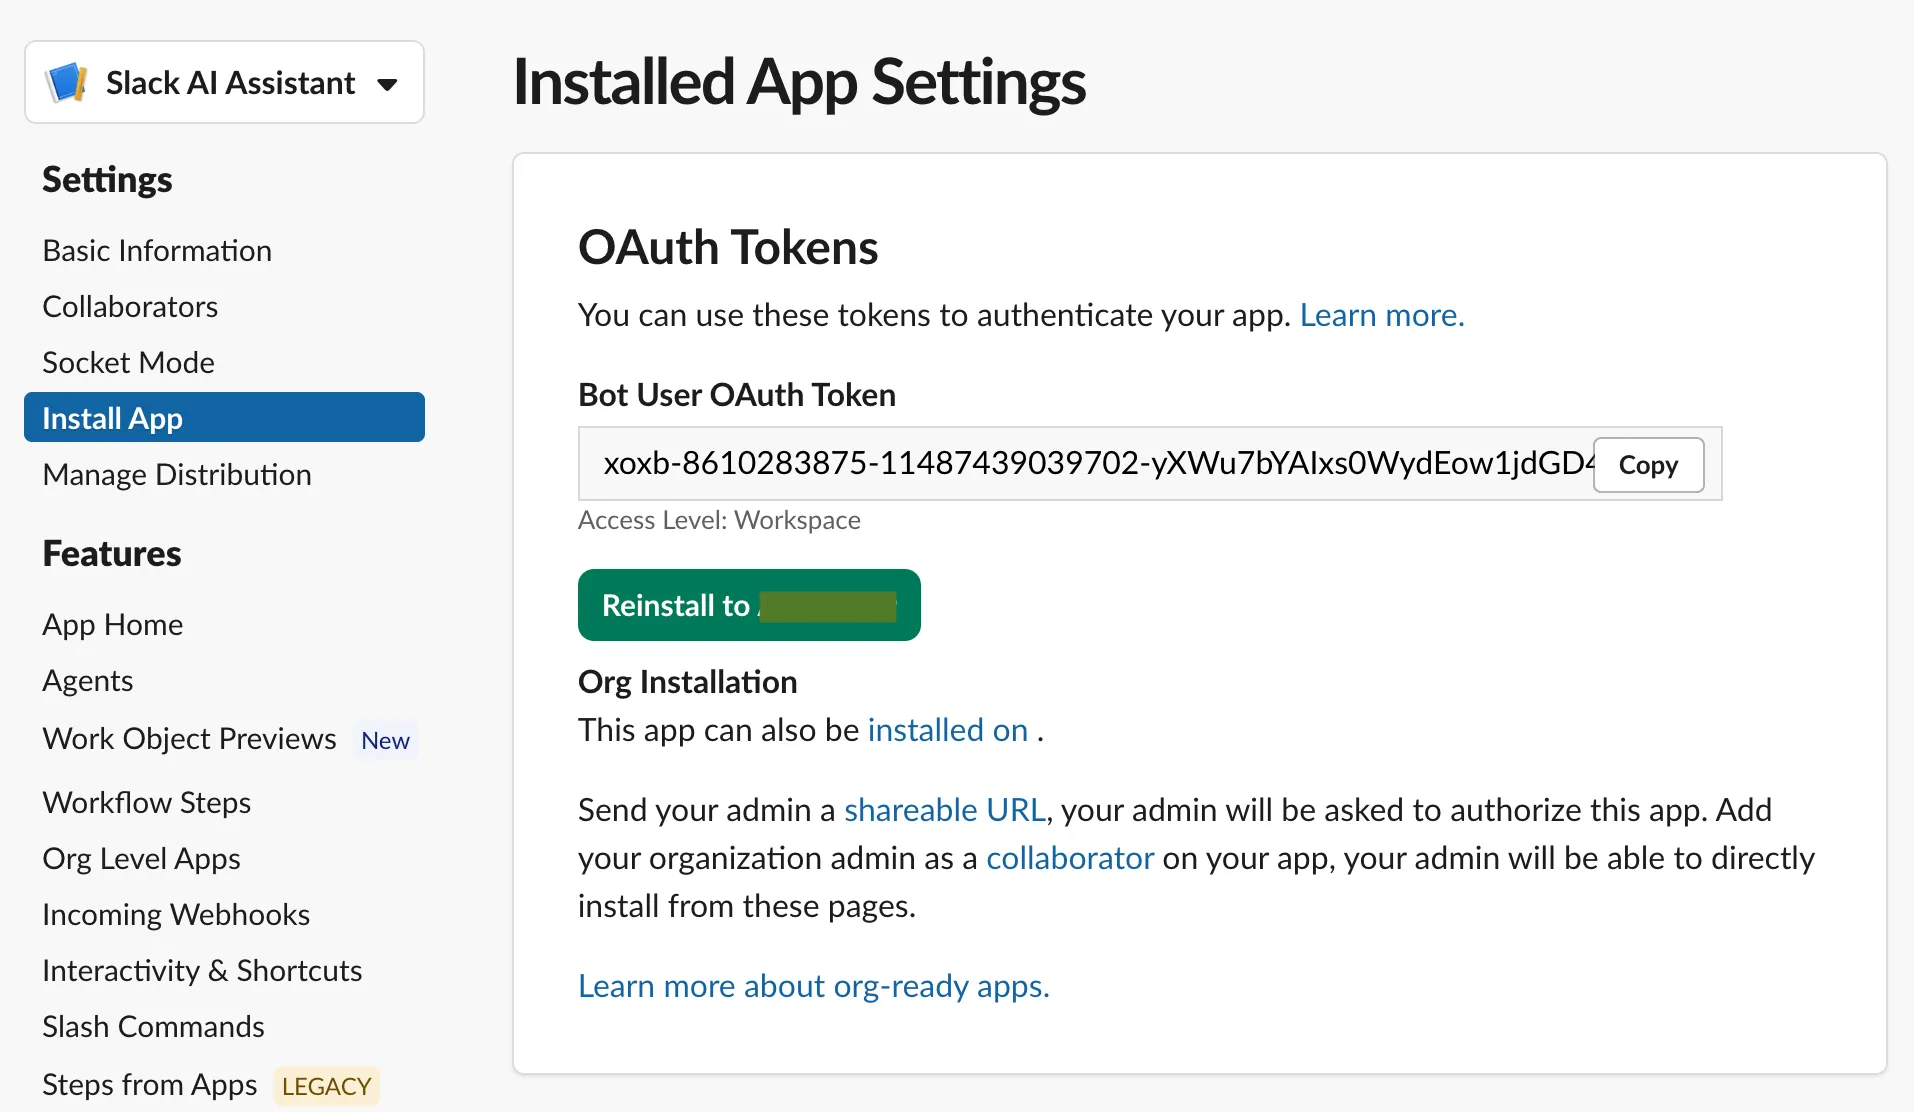
Our application requires two Slack tokens: a Bot User OAuth Token (xoxb-...) and an App-Level Token (xapp-...). Both can be generated from your Slack App dashboard.
Generate the Bot User OAuth Token
- Open your Slack App at https://api.slack.com/apps.
- Select your application.
- Navigate to OAuth & Permissions.
- Click Install to Workspace (or Reinstall to Workspace if you’ve updated the app).
After installation, copy the Bot User OAuth Token (xoxb-...) to SLACK_BOT_TOKEN inside .env file.
Generate the App-Level Token
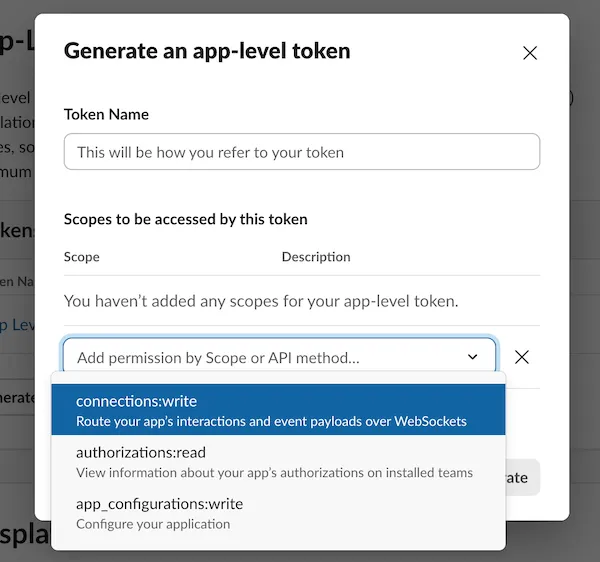
- In your Slack App dashboard, navigate to Basic Information.
- Scroll down to App-Level Tokens.
- Click Generate Token and Scopes.
- Give the token a name (for example,
Socket Mode). - Add the
connections:writescope.
Generate the token and copy the App-Level Token (xapp-...) to SLACK_APP_TOKEN inside .env file.
You’ll use both tokens in the .env file when configuring the application.
How Slack Communicates with Your Application
Before we start writing code, it’s helpful to understand how Slack, your Node.js application, and the OpenAI API work together. Whenever a user interacts with your assistant, several components work together behind the scenes to generate an AI-powered response.
The overall flow looks like this:
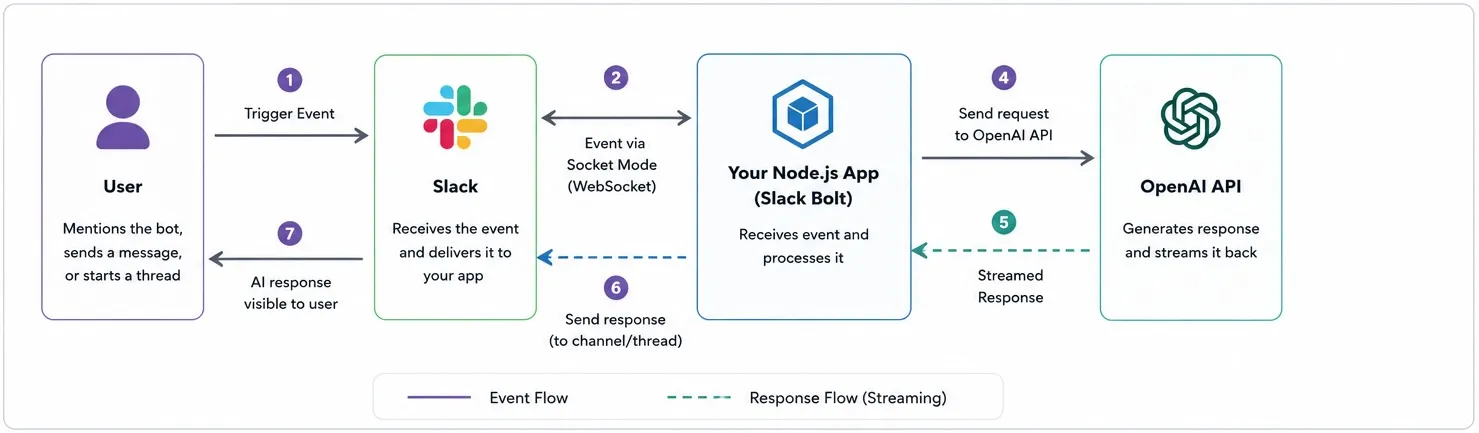
Here’s what happens step by step:
- User sends a message – A user mentions the assistant (for example,
@Slack AI Assistant) or starts an AI Assistant conversation. - Slack receives the event – Slack detects the interaction and sends an event to our application over Socket Mode.
- Slack Bolt processes the event – Our Node.js application receives the event, extracts the user’s message, and prepares a prompt for the language model.
- Call the OpenAI API – The application sends the user’s prompt to the configured OpenAI model.
- Generate a streaming response – OpenAI generates the response and streams it back to our application token by token.
- Send the response to Slack – Our application forwards the streamed response back to the Slack conversation in real time.
- Display the final answer – The user sees the AI-generated response directly inside Slack without leaving the conversation.
With the fundamentals out of the way, it’s time to dive into the implementation. We’ll begin by exploring the project structure, then configure our application, connect it to Slack and the OpenAI API, and finally build a fully functional Slack AI Assistant capable of generating streaming AI responses in real time.
Project Structure
Before we start changing code, let’s quickly understand how the project is organized.
This repository is intentionally small and focused. It keeps the Slack setup, OpenAI integration, and assistant event handling in separate files so the code is easy to follow and extend later.
slack-ai-assistant/
├── manifest.json                 # Slack App manifest
├── package.json                  # Project dependencies and scripts
├── package-lock.json
├── tsconfig.json                 # TypeScript configuration
├── README.md
│
├── scripts/
│   └── verify-env.ts             # Validates required environment variables
│
└── src/
    ├── app.ts                    # Application entry point
    ├── env.ts                    # Environment variable helpers
    │
    ├── agent/
    │   └── llm-caller.ts         # OpenAI integration and streaming responses
    │
    └── listeners/
        └── assistant/
└── index.ts # Slack AI Assistant event handlers| File | Purpose |
|---|---|
manifest.json | Defines the Slack App configuration, permissions, Socket Mode, bot events, and AI assistant settings. |
src/app.ts | Main application file. It initializes Slack Bolt, enables Socket Mode, registers listeners, and starts the app. |
src/env.ts | Contains small helper functions to read and validate environment variables. |
src/agent/llm-caller.ts | Handles the OpenAI API call and streams the model response back to Slack. |
src/listeners/assistant/index.ts | Registers Slack Assistant event handlers such as thread start, context changes, and user messages. |
scripts/verify-env.ts | Checks whether the required environment variables are available before running the app. |
package.json | Defines dependencies and scripts such as npm run dev, npm start, and npm run typecheck. |
The most important files for this tutorial are:
src/app.tssrc/agent/llm-caller.tssrc/listeners/assistant/index.ts
We will focus mainly on these files because they contain the core logic of the Slack AI Assistant: receiving Slack messages, sending prompts to OpenAI, and streaming AI-generated responses back into Slack.
Application Entry Point
The src/app.ts file is the starting point of our Slack AI Assistant. It brings together all the components we’ve discussed so far—loading configuration, creating the Slack Bolt application, registering listeners, and finally starting the application. Let’s walk through each step.
1. Load Environment Variables
The application begins by loading the required environment variables and reading the Slack credentials from the .env file.
import "dotenv/config";

const botToken = requiredEnv("SLACK_BOT_TOKEN");
const signingSecret = requiredEnv("SLACK_SIGNING_SECRET");
const appToken = process.env.SLACK_APP_TOKEN;
const socketMode = Boolean(appToken);
If an App Token is available, the application automatically enables Socket Mode.
2. Create the Slack Bolt Application
Next, we create a new Slack Bolt application by providing the required credentials and configuration.
const app = new App({
  token: botToken,
  signingSecret,
  socketMode,
  appToken: appToken ?? undefined,
  port: socketMode ? undefined : optionalNumberEnv("PORT", 3000),
  logLevel: LogLevel.INFO,
});
This initializes our Slack application and establishes the connection with Slack using either Socket Mode or the HTTP Events API.
3. Register Event Listeners
Once the application has been created, we register our Slack AI Assistant listeners.
registerAssistantListeners(app);
These listeners are responsible for handling assistant events such as new conversations, thread updates, and user interactions. We’ll explore them in more detail in the next section.
4. Start the Application
Finally, the application authenticates with Slack and starts listening for incoming events.
const auth = await app.client.auth.test({ token: botToken });
await app.start();
If everything is configured correctly, you’ll see a message similar to the following in your terminal:
Slack AI Assistant is running in Socket Mode as slack_ai_assistant.
At this point, your application is connected to Slack and ready to receive user messages.
Handling Slack Events
Now that our application is running, it’s time to respond to user interactions.
Slack notifies our application whenever an event occurs, such as a user mentioning the assistant, starting a new AI Assistant conversation, or sending a message. We register handlers for these events in src/listeners/assistant/index.ts.
The application registers all assistant-related event handlers using a single function:
registerAssistantListeners(app);
This keeps the application’s entry point clean while separating all Slack Assistant logic into its own module.
assistant_thread_started
This event is triggered when a user starts a new conversation with the Slack AI Assistant.
In our application, we:
- Save the thread context.
- Send a welcome message.
- Display a few suggested prompts to help users get started.
threadStarted: async ({ saveThreadContext, say, setSuggestedPrompts }) => {
  await saveThreadContext();

  await say("Hi, I am your Slack AI assistant. What can I help with?");

  await setSuggestedPrompts({
    title: "Try asking",
    prompts: [
      {
        title: "Summarize this channel",
        message: "Summarize the current channel context.",
      },
      {
        title: "Draft a reply",
        message: "Draft a concise reply for this discussion.",
      },
    ],
  });
}
assistant_thread_context_changed
Slack invokes this event whenever the conversation context changes.
Our implementation simply saves the updated thread context, allowing the assistant to maintain context as the conversation evolves.
threadContextChanged: async ({ saveThreadContext }) => {
  await saveThreadContext();
}
Although our simple assistant doesn’t use this context yet, it becomes extremely useful when we add conversation memory and RAG in the next part of this series.
app_mention
The application also supports the traditional Slack bot experience using app_mention events.
Whenever a user mentions the bot (for example, @Slack AI Assistant), Slack forwards the event to our application. We extract the user’s message, send it to the OpenAI API, and stream the generated response back into the same conversation.
This allows users to interact with the assistant directly from any Slack channel where the bot has been added.
Note: In this project, the
app_mentionevent is registered insrc/app.ts, while the Slack AI Assistant events are organized separately insrc/listeners/assistant/index.ts.
Processing User Messages
The most important handler is userMessage, which is executed whenever a user sends a message to the assistant.
After validating the incoming message, we:
- Extract the user’s prompt.
- Update the assistant title.
- Display a “thinking…” status.
- Send the prompt to the OpenAI API.
- Stream the AI-generated response back to Slack.
await setTitle(text.slice(0, 80));
await setStatus("thinking...");

const streamer = sayStream();

await callLLM(streamer, [
  {
    role: "system",
    content:
      "You are a concise Slack AI assistant. Answer clearly and format responses for Slack markdown.",
  },
  {
    role: "user",
    content: text,
  },
]);

await streamer.stop();
await setStatus("");
Notice that we use sayStream() instead of say(). This enables the assistant to stream tokens back to Slack in real time, providing a much smoother user experience than waiting for the complete response before displaying it.
Integrating the OpenAI API & Generating AI Responses
With our Slack event handlers in place, the next step is to generate AI-powered responses. All OpenAI-related logic is kept in src/agent/llm-caller.ts, making it easy to maintain or swap models in the future.
Creating the OpenAI Client
We begin by creating an OpenAI client using the API key stored in our environment variables. We also read the model name from the configuration so it can be changed without modifying the source code.
const openai = new OpenAI({
  apiKey: process.env.OPENAI_API_KEY,
});
const model = process.env.OPENAI_MODEL ?? "gpt-4o-mini";
Sending the Prompt
When a user sends a message, the userMessage handler prepares the conversation and calls the callLLM() function. The prompt contains both the system message and the user’s message, giving the model the context it needs to generate an appropriate response.
await callLLM(streamer, [
  {
    role: "system",
    content:
      "You are a concise Slack AI assistant. Answer clearly and format responses for Slack markdown.",
  },
  {
    role: "user",
    content: text,
  },
]);
Streaming AI Responses
Instead of waiting for the entire response to be generated, we enable streaming by setting stream: true. As OpenAI produces each token, it’s immediately forwarded to Slack, allowing users to see the response appear in real time.
const response = await openai.responses.create({
  model,
  input,
  stream: true,
});

for await (const event of response) {
  if (event.type === "response.output_text.delta" && event.delta) {
    await streamer.append({
      markdown_text: event.delta,
    });
  }
}
This streaming approach provides a faster and more interactive experience compared to waiting for the complete response before displaying it. It’s also one of the key features that makes modern AI assistants feel responsive and natural to use.
Running the Application
With everything configured, it’s time to start the Slack AI Assistant.
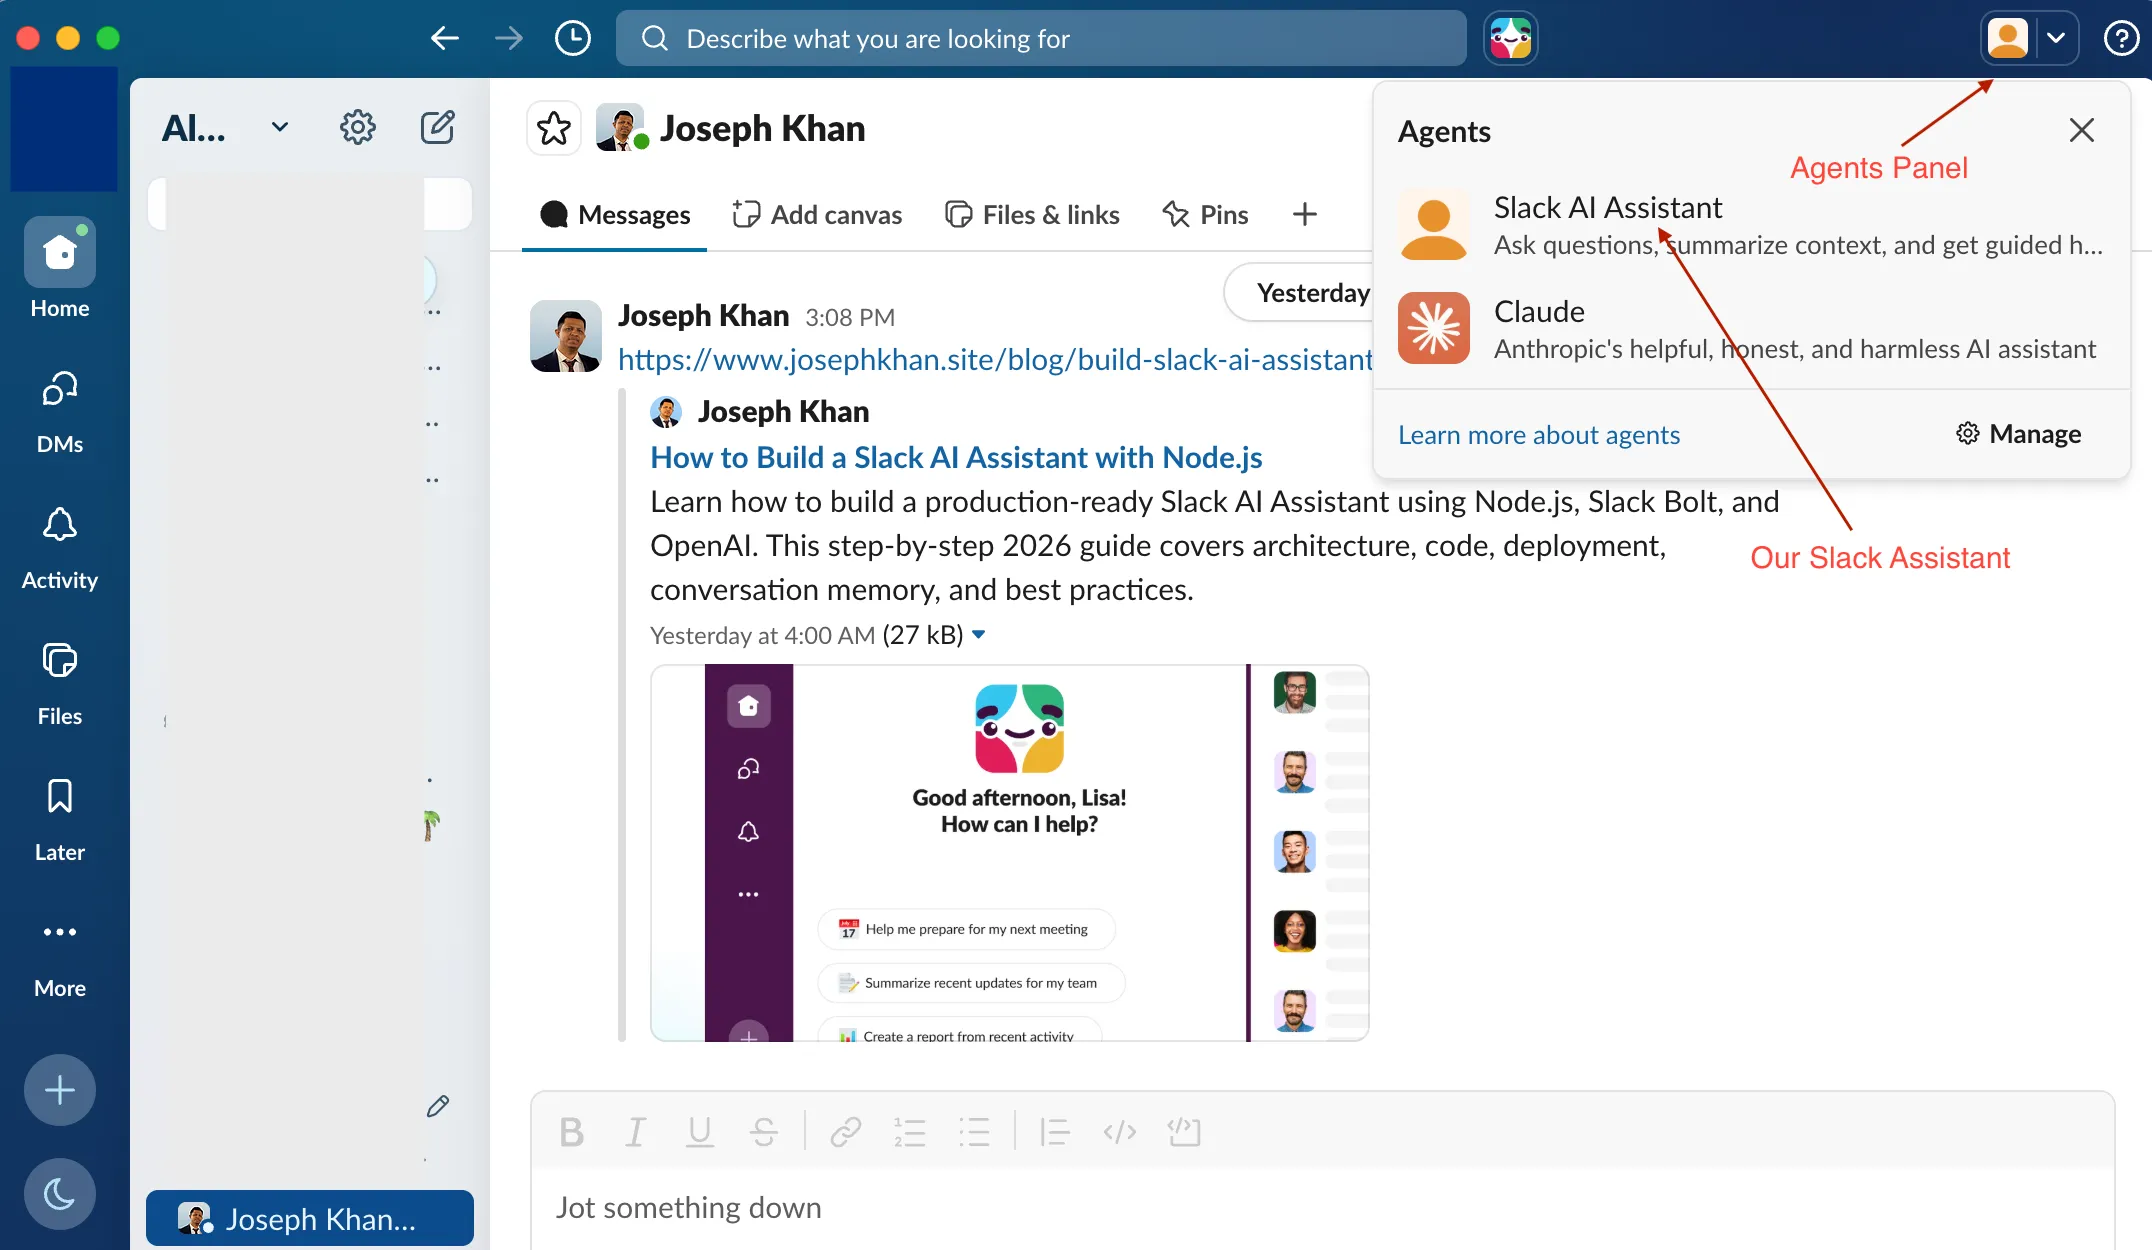
Run the following command from the project root:
npm run devOpen your Slack workspace, start a new AI Assistant conversation & begin asking questions. Your assistant should generate and stream AI-powered responses in real time.
Testing the Assistant
Congratulations! You now have a fully functional Slack AI Assistant powered by the OpenAI API. Try asking questions such as:
- What is Retrieval-Augmented Generation (RAG)?
- Who is the 46th President of the USA?
- etc
Source Code
The complete source code for this tutorial is available on GitHub.
GitHub Repository: https://github.com/jsphkhan/slack-ai-assistant
Feel free to clone the repository, experiment with the code, and use it as a starting point for your own Slack AI Assistant projects.
What’s Next?
In this tutorial, we built a simple Slack AI Assistant that communicates directly with the OpenAI API and streams AI-generated responses back to Slack. While this is a great starting point, the assistant doesn’t yet have knowledge of your organization’s documents or previous conversations. In the next part of this series, we’ll transform it into a production-ready AI assistant by adding:
- Retrieval-Augmented Generation (RAG) for answering questions from your own documents.
- Conversation Memory to maintain context across Slack threads.
- Thread Context to provide more accurate and personalized responses.
- A Vector Database for efficient semantic search over your knowledge base.
By the end of Part 2, you’ll have a Slack AI Assistant capable of answering questions using your own documentation while maintaining context throughout the conversation, bringing it much closer to a real-world enterprise AI assistant.
References
- https://docs.slack.dev/tools/bolt-js/tutorials/ai-assistant/
- https://github.com/jsphkhan/slack-ai-assistant/blob/main/README.md
If you enjoyed this article, you may also like my other articles: